Notice!
I have updated and simplified the Home Built WiFi Repeater.
Check out the new-and-improved WiFi Repeater here:
http://mvvikingstar.blogspot.com/2014/02/wifi-repeater-for-boat-update.html
=================================================
================================================
This post is long overdue, but as things are slowing down figured I would get to it.

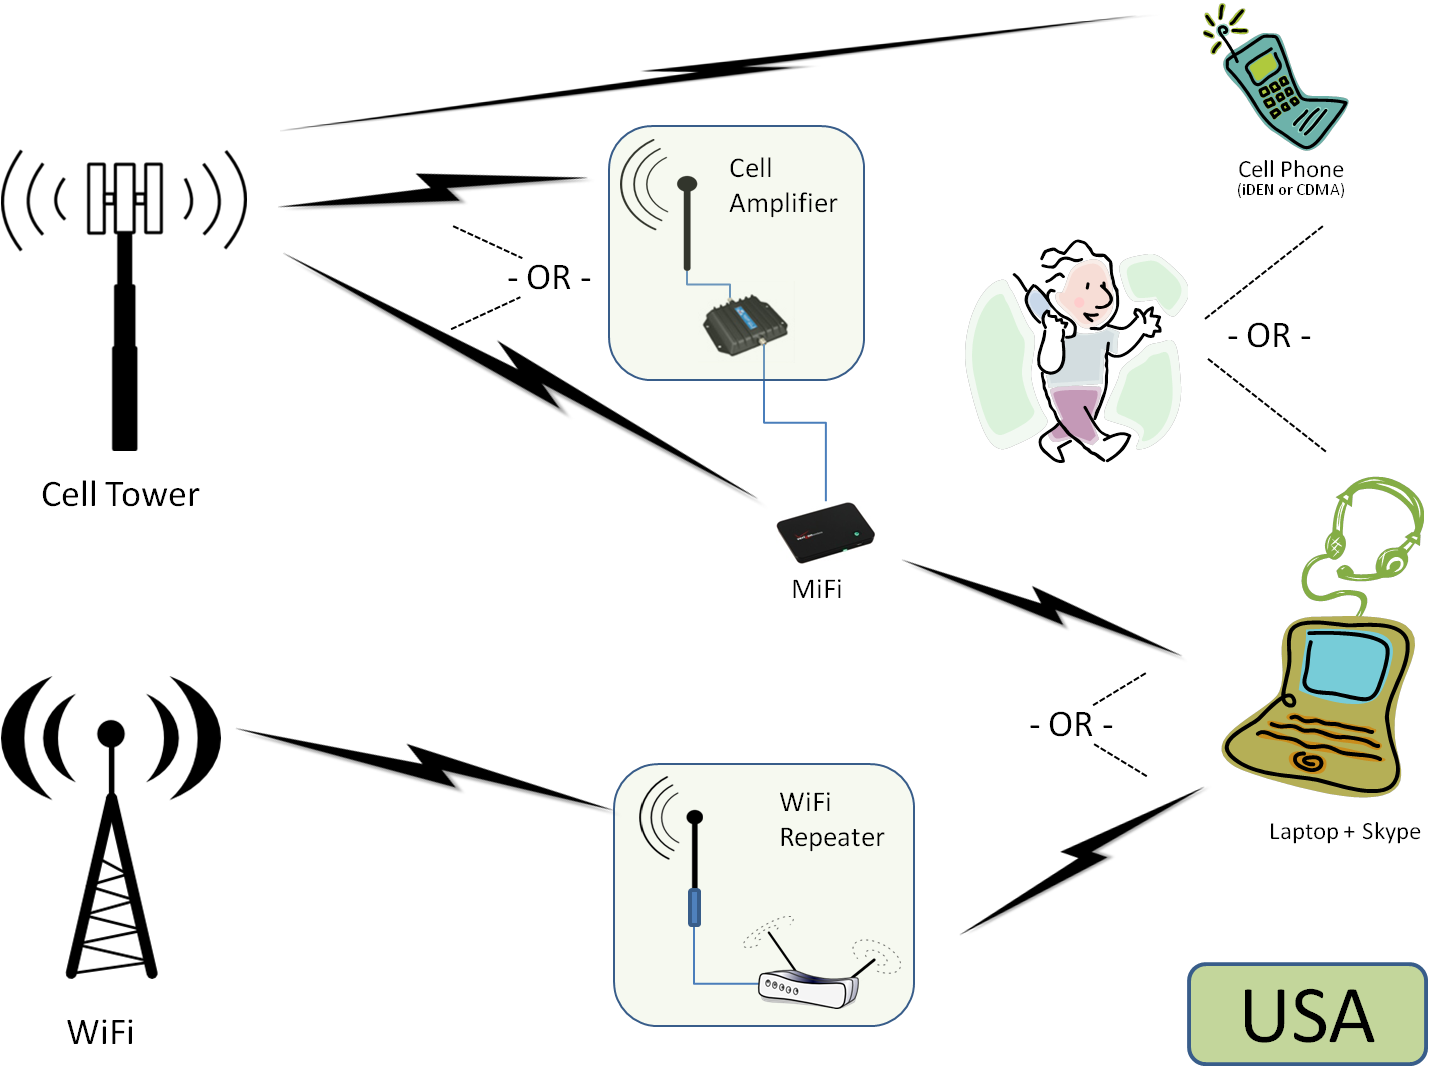
As shown in
Can you Hear Me Now? we have installed a WiFi repeater aboard Viking Star. The primary purpose of this repeater is to reach out and connect to a distant WiFi station, one MUCH further than could be done using just our laptops themselves. And the 2nd purpose of this 'repeater' is to allow more than one computer to share a distant connection.
There are several ways to get long distant WiFi connections, starting with external USB dongles-- often augmented by empty Pringles Cans or wire cooking colanders. Hey, don't laugh, they work rather well. Google up: "Poor Mans WiFi" and see what folks have done! More elaborate (and better range) systems use Ethernet-based external WiFi receivers, or even more elaborate repeater systems like we have here on Viking Star.
And there is also a wide range of prices, from as low as $15 for an external USB Dongle + wire basket, to approaching $1,000 for a proper repeater system like shown here.
But if you all know me, you know I did not pay $1,000 for our system. (And no one should, there are well-designed, pre-configured systems out there for under $400).
Almost all of the current advanced WiFi systems are based around the Ubiquiti Networks 'Bullet'
www.ubnt.com/bullet. These low cost devices are wonderful radios, featuring high power and good sensitivity, mounted in an all-weather case with Power-over-Ethernet -- so only one wire needs to be routed to the device. In the simplest form using one of these units, an antenna, some CAT-5 cable and a POE injector and you can be up an running on one computer for just a bit over $100. Add a simple router and you get the complete repeater system for under $150. And less if you happen to have some parts lying around!
There are a few companies who will pre-bundle these kits for you, and to be honest I kind of like this one:
www.wavewifi.com. For about $375 you get a complete kit with all the parts, including a router! One of the other reasons I like these folks is they have gone in and simplified the Bullet firmware, making it simple to setup and use their system. Almost all other 'kits' out there leave the default Ubiquit firmware in place, which can be a bit overwhelming. WaveWiFi has done a great job in simplifying everything.
Another provider that gets a lot of good comments is:
www.islandtimepc.com/marine_wifi.html. Their offering is the basic stuff, no extra firmware and is no different than what you could purchase independently - ala below. But it does all come at once, and they have some creative antenna mounting solutions as well. Starts at $250, more for different antenna mounts and optional router. Recently
www.thewirie.com/index.html was passed on to me. Also around $365 for their router version, they too have done a nice job of integrating and writing a custom firmware to make usage simpler. They also do NOT use the bullet, but instead an Alps USB adapter for their internal workings.
A comment on that: The only question I can see about TheWiirie is - the Alps addapter is a consumer rated vs. commercial rated device - with the key difference being temperature range. Consumer devices typically from from 0-50c (32-122f), while commercial devices typical are speced for -20c to 85c (or -40f to 185f). For a device mounted outside, using consumer grade devices can impact reliability as well as performance when outside of 'room' temperature.)
Now if you want to save some $$$, know a little about setting up IP routers and such, keep reading!
WiFi repeater used on Viking Star
Here is an overview of all the DIY-Repeater:
Hardware:
- Bullet M2-HP, ala: www.invictuswireless.com/M2-HP....... $78
- 9dbi Omni-directional Antenna, ala: www.invictuswireless.com/24_9OD_p. . . . $43
- CAT-5 Patch Cable - long enough to match your installation
- 12v 'Router' of your choice (I used a Linksys WRT54G V5)
- PoE Injector - Easy way, or modify the Router (Free way - see below) $5 (?)
- 3M Supper88 Plastic Electricians tape
- 3M SCOTCH 2210 VINYL MASTIC Water-proof seal
So for around $130-150 you can have a 1st class WiFi repeater.. And if you shop around some and/or have parts on hand already, maybe even less! (I picked up my antenna for $10 off of Ebay, and already had the WRT54G).
A comments on the components. Ubiquit has released a 'titanium' series of bullets - using an aluminum case instead of plastic. Yes, they might be nice, but they also cost around $120. Your call, but I think the standard plastic one is fine. Also, make sure you get an M2 bullet, not the M5 ones. The M5 ones use a different (and uncommon) frequency. And also make sure you get the HP version (M2-HP). The High Power one puts out 8x the power as the standard M2 bullet. The standard bullet costs under $40, so be careful what you end up getting when you buy.
On the antenna 8-9dBi is about the right gain. Anything higher and the beam becomes too flat and tight. Not only an issue with a rocking boat, but if you get too flat a beam there is a good chance the shore-based station will be physical too high for your antenna to see it. And for the same reason do NOT get an antenna with any 'Down Tilt'. Down Tilt will direct the beam down towards the water, when you are more than likely trying to get up to the shore. Get a flat, or 0-tilt, antenna and try to mount it 15' or so above the water.
CAT-5 cable just needs to be long enough to get from where you mount the Bullet to inside and the Router. I did not get 'special' outdoor cable, but did get good quality cable. It is also routed inside the mast out of the sun, and the part that is exposed got an extra wrapping of electrical tape for added UV protection. (Be careful, recently I purchased some Chinese cables and found the
wires were not copper! Best to purchase a US made cable. US made, not
US 'branded')
The Router can be any old 'home' router you might have kicking around. Take care to check that it uses a 12V external power supply. I had an old Lynksys WRT54G lying around that works great. Make sure it is a 12v one, some of the versions used 5V supplies. See here:
Wikipedia.org/wiki/Linksys_WRT54G_series The reason for this is we are going to connect this router directly to the boats 12v system and we do not want to risk letting any of the magic smoke out of the router.
The last two items are actually ones you will not see on other kits. The tape and mastic is used to wrap up the bullet and make it very water resistant There is a common concern around exposed Bullets, and there has been cases where water intrusion fouled things up. (and one reasons I think Ubni released the Titanium series). But in any case, a good wrapping seems to be what the "Pro's" have done for years on cable telco and other RF outdoor systems. No matter what you end up purchasing, consider adding this step to your installation. (and BTW, this is not too bad of an idea for any exposed RF connectors. I wrapped out AIS antenna in the same way, while our VHF antenna connector was already inside a weather protected sleeve.)
And do NOT skimp on the Super88 plastic tape. It does cost more, but is well worth it. The 2210 Mastic is the key to making waterproof enclosure between the Bullet and the Antenna, as well as the Cat-5 cable. (And why I do not think the Titanium bullet is needed - its all going to get wrapped up anyway). It might be available at a Big-Box store, or mail order. It comes in 10' rolls for around $50, so unless you are going to do a LOT of these you might see if someone wants to go in with you. I ended up being able to purchase some by-the-foot at an electrical supply house.
Power to the Bullet! - The Easy Way
At this point we are almost done. All that needs to be figured out is how to get 12V up to the Bullet via the POE (Power Over Ethernet) feature on the CAT-5 cable. Probable the simplest way is to purchase a PoE injector like this one:
www.invictuswireless.com/RBPOE . . . . At only $5 had this been available when I first installed the repeater I would have gone that way.
 |
| Spend the $5 and get a PoE adapter, trust me! |
Power to the Bullet! - The Hard Way. . . .
Sadly, when I put this together these low cost PoE adapters were not available, so I modified the inside of the WRT54G to provide the PoE function. And even today it is a free solution!
To do so one needs to take off the plastic housing. The two ends just snaps off and you can extract the PCB unit attached to a plastic carrier. What we are going to do is solder two jumper wires from the 12v power connect to the appropriated pins on one of the RJ-45 Ethernet connectors. In this way you will be able to send 12v up to the Bullet over the same CAT-5 cable used to communicate with the Bullet. Take note that we are going to use one of the block of 4 LAN connects for this, not the single WAN connector. (When I first did this, I was not sure which one I would end up using, so I soldered wires to both one of the block of 4 and the WAN. In the end, you only need to do one of the block of 4)
After taking the case apart remove those two Mounting Screws, then the PCB can slide back and be pulled from the carrier.
Flipping the board over and locate the Power Connector and one of the RJ-45 connectors in the Block of 4. Then solder two jumper wires (one red, one black) from the power connector to the appropriate pins on the selected RJ-45. CAUTION: The photos show a V5 release of the WRT-54G, if you have a different version you will need to locate the appropriate power jack pins, and make sure the pins on the RJ-45 are not 'connected' to something else already. . . . really, at this point that $5 PoE injector is looking really nice!
 |
Remember, you need only to solder on one set of wires.
Make sure to mark on the outside some way which of the RJ-45
connectors you soldered the wires to. (I used a Sharpie) |
Now put everything back together and lets see if it all works. Up to this point the Router should function as it always has and you can do any testing you wish before moving on.
Mount the antenna and Bullet outside and bring the CAT-5 cable back into the boat. Mount your router someplace inside the boat plugin the CAT-5 cable into the market RJ-45 connector you soldered the 12v wires to. (Or if using the injector, CAT-5 goes to the injector, and injector goes to any of the LAN / group-of-four jacks. Do NOT use the WAN jack as we will soon be disabling this.) Wire a lead from your house 12v system, via an on/off switch to the DC jack on the WRT54G and you are all set to go.
Connections to the WRT-54G
As mentioned above, when connecting the bullet to the WRT-54G you want to use one of the LAN ports - not the WAN port. So, connect the bullet (with or without the PoE injector) as shown:
Making it Waterproof
Some time ago I captured these steps written by Bob Hrbek on how to properly tape up an external connector. the way the Pro's have done things for years on RF installations. His website is gone now, but I saved a copy and here is the gist of it:
- Use the Supper88 tape to make 'Courtesy Wrap's directly over the antenna connection and the place where the CAT-5 wire comes out the bottom. This is just a couple of turns of the tape which will aid in un-gunking things if (when) you need to open things up in the future for servicing Do not go wild on this, just a single layer a couple of tape widths wide is sufficient Some folks even put the tape on Backwards (sticky side out) to work even better.
- Using the SCOTT 2210 mastic to cover everything up. Starting about 2 inches above the top of the Bullet antenna connector to a couple of inches below the CAT-5 cable. It is a self fusing tape, pull it firm, make about 2 layers, and then mash it all together into a fused ball.
- Cover it all up with two wraps of the Super88 electrical tape. Making sure to go a bit higher on the antenna and the CAT-5 cable with each wrap.
In 8 years of outdoor use, I have never had a problem with water intrusion. And yes, I did have to Unwrap things once, so was very happy I had put the Courtesy tape on.
Configuring the Router and Bullet
Here I am going to give an overview of how to configure the Router and the Bullet, as well as how to use it for connecting to external WiFi networks. Again, these instructions are for the WRT54G router. If you are using something else, the ideas will be the same, but obviously the screen shots will be different. And if you run into things like the default Router address is in a different subnet (ala 192.168.0.x instead of 192.168.1.x) then you will need to do some additional work. If this gets too deep, just use a WRT54G, ask someone you know, or purchase a pre-configured kit.
In summary what we are going to do is disable some functions in the WRT54G, namely: NAT , DHCP, and Firewall. This is why we needed to connect to a LAN port, not the WAN port. We will leave the internal Ethernet switch and local WiFi radio access intact. And then the Bullet will be configured to pick up these disabled functions, as well as take care of the long distance WiFi duty. We will do this in three phases:
- Configure Bullet
- Configure Router
- Fine tune the Bullet
- Attach Bullet to external WiFi network.
To start with, perhaps it is simplest to reset the Router to its default factor configuration Either by the reset button, or perhaps some command. But lets start with a clean slate. We will assume the Bullet is also in its default configuration. In my case, this placed the two at:
- 192.168.1.1 = Linksys WRT54G
- 192.168.1.20 = Bullet
It is simpler to connect a physical LAN wire from your computer to the WRT54 until we get all the basic set up. But your call, all the following CAN be done cold via a wireless connection, but you will have a few more reboot steps in there....
First Step: Configure the Bullet.
The Bullet by default acts as a 'transmitter'*, or more correctly an Access Point. An Access Point is what you connect your computer to. Instead of transmitting, we want the bullet to behave more like our computer To reach out over the water and connect to a distant access point.. To do this, we need to configure the Bullet act as a receiver*, like your computer; we do this by changing the Wireless Mode from Access Point to Station.
* Yes, I know the words Transmitter and Receiver are not being used properly here, but I though it might better explain things. The correct words are: Access Point and Station. And being truthful - Router is a word that is not totally correct when referring to the WRT54G, but it is in common usage. . .
First lets set up a new password. Open up a browser, type in 192.168.1.20. Enter the default ubnt for the user name and ubnt for the password as well. Click on the System Tab and change the Administrator password to something other than the default (click on the key image next to the username):
Take note of the Configuration Management section: After all is done, it is very helpful to backup the Bullets configuration on your PC. But for now lets move on. Click on the Change button at the bottom and a pop-up will appear at the top. For now, do NOT click the Apply button in this pop-up.
Next we want to select the Network tab.
Here is where we will make the most changes and enable all those features we disabled in the WRT54G.
- In Network Role, change the Network Setting setting to Router.
- In the WLAN section, change the DHCP address to something like I have. We will be moving everything away from the common 192.168.0.x or 192.168.1.x. Not doing so might make it more difficult to manage your new WiFi repeater when it is connected to an external network. You can pick lots of different addresses, just make sure it is one of the 'protected' local-only block of numbers. I selected to use 192.168.37.x for all my setups.
- In the LAN network section, put in a new IP Address, and then check all the NAT boxes as shown.
- Still in the LAN section, check the Enable DHCP box and fill in the appropriated start and end ranges. This is where we will pick up the DHCP and NAT functions we disabled in the WRT54G
Again click on the Change button at the bottom of the screen, and this time do click on the Apply button that pops up at the top. We are done with the Bullet for now and ready to 'configure' the router.
Next step: Configuring the 'Router'
Next we move to the WRT54G, and here we want to disable some of the functions we enabled in the Bullet (NAT, DHCP), move it to the new 'block' of IP numbers we selected, and set up the local wireless connection. Going to your default manager screen still at 192.168.1.1. Change your password on the Admin tab. And then go to the Setup tab and the Basic Setup sub-screen:
- Change the Local IP address to something unique within your new selected block of addresses. (I selected 192.168.37.6)
- Disable the DHCP server - the internal NAT server will automatically be disabled as well.
Now select the Wireless tab to set up the local boats WiFi. These steps are EXACTLY same steps you would do if you were using this router in your home. Give it an SSID name that works for you, enable the appropriate security, and if you are able to, turn down the power to a low setting (unless you have a really BIG boat). Make sure to set up any wireless passwords and such, again just like you would do at home.
Fine tune the Bullet
OK, save the changes and cycle the power to reset both the WRT54G and the bullet. When they come back up you should now be able to connect to the WRT54G via the new wireless settings. And if you want, check to make sure your computers IP address has been assigned inside the new address range you selected. If not, something is wrong. Assuming things went well, opening up a browser you should find the WRT54G at the new IP address you selected (192.168.37.6 in my case), and the Bullet at its new address (192.168.37.7 in my case). Go ahead and log into each one using your new password. We have one more thing to do to the Bullet before we are ready to start using the system.
The Bullet has a couple of features in it for remote resetting that we want to take advantage of. In this way, if something 'Goes Wrong' we can reset the bullet to its default state and start over. Normally this would require physical access to the bullet - pressing a small button on the bottom of it. But given that this unit will likely by mounted outside, up a mast somewhere, and covered with mastic, let's explore other options.
The first is a Watch Dog. The idea behind a Watch Dog is that if we pet the dog every once in a while, he will be satisfied and behave. But if we go too long and forget to pet him he starts barking. In this case, the pet will be pinging the WRT54, and the barking will be to reset the Bullet. On the Bullet management screen, go to the Services tab and click the Enable Ping Watchdog box. Then enter the IP address you assigned to the 'Router' (192.168.37.6 in my case). Put in some good long delays to help reduce accidental triggers, and also a failed count. Note I used 300 seconds and 3 counts. This means I might have to wait as long as 15 minutes to reset if needed. But that sure is better than climbing the pole!
Click the Change button, and then the Apply button that pops up. Once things reboot, you might want to go to the System tab and save the configuration file. The WRT54G also has a save configure feature on its Administration / Config management tab.
That is it! We are all set! And if you ever need to 'reset to default' just press the physical reset button on the WRT54G. This will cause it to load its default location of 192.168.1.1, and after 15 minutes of the Bullet not be able to 'see' it at 192.168.37.6 will cause the Bullet to restore its default config as well.
There is a 2nd way to 'reset' the bullet remotely, but we will come back to that later.
Attach Bullet to external WiFi network.
OK. We are all ready to use our new WiFi repeater! Power everything up and log into the Bullet screen (192.168.37.7 in my case) and select the wireless tab, then click the Site Survey button:
Here in Friday Harbor I can see over 50 different access points via the Bullet, a result of the 8dBi gain antenna, it's location up high, and the relatively good receive sensitivity in the bullet itself. For reference, my IBM Thinkpad can only see 4. Check the button next to the one you want to use, and copy down the MAC address as well. Scroll to the bottom of the Site Survey screen and click the Select button. When you return to the Wireless screen, paste in the MAC address of the station you selected into the Lock to AP MAC box. Do what is needed in the Wireless Security screen, click Change and accept and enjoy!
We have had this system aboard Viking Star for many years now; it is our 2nd generation system and has worked very well for us. Not only are we able to connect to WiFi access points over great distances, but we are also able to get around some issues we have run across in marinas. Things like one of their access points still transmitting but not actually being connected to the internet. Being able to Lock In to a specific MAC address of the AP allows us to freeze out misbehaving marina WiFi nodes. In the case here at Friday Harbor, they have a WiFi Mesh. By being able to lock into a MAC, we lock onto the entry point of the mesh, as opposed to the closest node to us (which is about 3-4 mesh-hops away from the entry point). This gives us better speed and reliability of internet access.
And though they are getting better, many marinas' WiFi installations are not the best. In places where the office staff says 'well, it works best here, and if you are in slips 1 to 10 some folks can get it' we have found the repeater often will work just fine.
Big Ears and Big Mouth
WiFi communication is actually both directions, to the boat and from the boat. Makes sense and hence why 'transmitter' and 'receiver' are not really correct. Just like two people communicating, each person needs to able to speak and hear. If you want to communicate over a longer distance, you need to speak louder, and maybe put your hands next to your ears to be able to hear better.
The repeater is doing the same thing. Using a more powerful transmitter in the Bullet, we have a much bigger mouth than the laptop, and the gain of the antenna gives better ears. But this is not always enough. One situation we have found where the repeater does not work very well is in a crowded city. When we were in Portland at the Blues Fest we were able to 'see' over 200 stations. But even though we were only a couple 100 yards from an access point we were not able to connect to it. I liken it to being at two sides of a room at a very crowded party. Even though we are yelling at each other (Big Mouths), and cupping our ears (Big Ears), there is just too much noise around to be able to effectively communicate. WiFi was designed to work at a range of 100' or so, and as such, when there are a LOT of stations in place there is really no method for coordinating all that yelling . . . . of course using a highly directioned antenna would solve this. But for us, we just grab the laptops and walk up to the coffee shop.
And to be honest, that was the ONLY place where the repeater failed us. All else, it has been great. And despite the claims in advertisements, I think the longest reach we have ever done was 2 miles. Even so, not bad! With the repeater we have a Big Mouth and Big Ears, to get the range we need to have a access point that also has a Big Mouth and Big Ears. Getting a long range is more dependent on what is at the other end. 2 miles most definitely was a Big / Big guy. Those small in-home access points, the ones like the WRT54G that are designed to work up to say 100'? Well, with those we might get only a half mile out of them.
Why LAN and not WAN connector?
Someone asked me why I connected the Bullet to the LAN port and moved the NAT and DHCP functions from the WRT54G to the Bullet, as opposed to the more 'traditional' setup of plugging the Bullet into the WAN port. IIRC, I had tried several configurations (hence the PoE wires to the WAN and LAN port) and decided on this approach for two reasons:
- Using the WAN port I could not 'see' the bullet at its default 192.168.1.20 address. This was because the WRT54G had reserved the whole 192.168.1.x address space for its 'local' use and would not pass out anything in that space out via the WAN port. Moving the WRT54G to a different address space (ala 192.168.0.x) solved this problem.
- But - with the NAT not being enabled in the Bullet I found that if I attached to a remote WiFi network which had also been setup in the 192.168.1.x address space, I could no longer gain access to the bullets setup and management screen as the remote WiFi had assigned a new address to the bullet. I COULD have hard-coded its address, but that would raise the potential of address conflict. This was a pain, and required 'remote resetting' the bullet to regain control.
Moving everything to a less used address space (ala 192.168.37.x) helps, but there still is the POSSIBILITY of #2 above happening. By using the LAN port and setting things up like I did, there is no risk. And if by chance I do attach to a 192.168.37.x network I will still be able to see the WRT54G and the Bullet. I just would not be able to 'see' outside to their systems subnet. Which is OK, as I really do not need to be messing with someone else's access point setup screens. . . . (Note that Internet access will still be passed through and work, it is just request to the local subnet that would be restricted to Viking Star's network and not be passed out to the external Access points WiFi).
It might be possible to leave the DHCP function in the WRT54G, but I suspect the NAT needs to go to the Bullet to prevent it from being 'captured' by an external WiFi access point which happens to be in the same address space as I am. . .
And one other point: The Bullet Watchdog timer needs to be able to 'see' the WRT54G and ping it. I suppose I could have used the WAN port, enabled NAT in the Bullet, placed the Bullet and the WRT54G on different sub-nets, and enabled an external address for the WRT54G via the WAN port for the bullet to Ping. Doing all this seems like a bit more work then what I ended up doing.
If anyone out there really knows this stuff and has some ideas - please send them in!
Final Thought - the other way to remotely reset the Bullet
It turns out the Bullets have an undocumented feature to do remote resetting. This person figured it out, and it involves placing a voltage of 14-15v or more into the communication lines of the CAT-5 cable.
http://dren.dk/mreset.html
Cool little feature that DROVE ME 100% NUTS FOR A FEW YEARS! See, it turns out my bullet triggers at about 14.2v, and it also turns out that for some unknown reason the WRT54G connected the + side of the power supply to the signal lines! So, when we came into our slip, plugged in shore power all worked great. I would go away, the batteries would charge up, reach their 14.6v set point and reset the bullet. . . . Took me a LOONG time to finally figure out this one. (And it is why I was glad that I had used the Courtesy Wrap in the waterproofing!). There are a few way around this. Selected a different Router than the WRT54G I had on hand, install a couple of dropping diodes into the supply voltage going into the WRT54G (which I did and it has worked well to this point), or on the System Tab un-click the Enable Reset Button box. Doing so will not only disable the undocumented remote reset feature, but will also disable the reset button itself on the bullet. The downside is, of course, if something really bad happens and you NEED to press that button, it will never - ever - work. But, at under $80 each (wow they have gone up. I paid $49 for mine), I guess if you NEED to press that button - after climbing the mast and undoing the goop, just putting in a new one is not that bad...
I do not know if unclicking the 'enable reset' button will also prevent the watchdog timer for doing a reset. For now, the two diodes in the +12v line to the WRT54G are working well for me. If they stop doing so and I end up having issues down the road perhaps I will look into this area a bit more.
I like to use these 'power' Bridge Rectifiers for things like Voltage Dropping They are relatively low cost (as long as you do not purchase them at Radio Shack!). But mostly I like them because due to their physical mass: they have a sufficient level of heat-dissipation capability all by them self without the need to extra heat-sinks. (For this application! We are only drawing perhaps 1-2Amps MAX).
Just run the battery power to the '-' terminal on the bridge-rectifier, and then the '+' terminal to the WRT54G. We will not use the '~' terminals in this application. You can even clip those off if you want, but do make sure to cover them with some electrical tape, to reduce the change of stray wires shorting.
========================================================================
OVERVIEW
And here is again, all put together:
 |
| Showing usage of PeO injector |