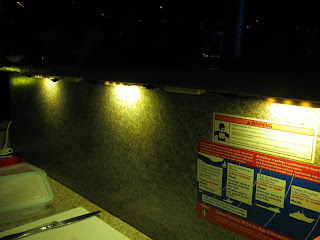
 Here is a fun project I did a while ago, putting up a string of inexpensive LEDs as under-the-counter lighting. Lots and lots of LEDs are out there, these are the ones I picked up a couply of winters ago when I was back in Portland: www.surplusgizmos.com/3-LED-Warm-White-Waterproof-Strip-25003500K-3750mcd-12v-DC_p_1952.html
They cost $1.85, come in Red, White, Warm White, Green, Yellow.. What is curious is I can find ones CLOSE to this on Ebay for around $1 each, but they do not have the connectors on them - just hard wire pig-tails.
And is is the connectors that make this kind of a fun project.
See, I mixed red and white LEDs - added a two position switch and now we can selected between the Warm White glow, or eye saving Red night light! I stewed for a while trying to figure out how to make a clean and tidy installation, without a bunch of 'extra' wires running around. (ala, one for White, one for Red, and one for return, plus lots of splices and connectors..). Notice in the top photo how all the LEDs are daisy-chained, one right after another? If all I had was one color that would be straightforward - wire up an on/off switch and link them one after another. But in fact, these LED blocks alternator between White and Red. And I was able to do with with the existing wires, by using a little electrical magic.
Starting with a DPDT - Center Off switch wired as a 'reversing' switch I am able to get either 12v normal polarity sent down the wires, or 12v reversed polarity, depending on which way the switch is toggled. Right for White, Left (port) for Red. Center for power-off. LEDs being Diodes will either light up when presented with correct polarity, or will not when presented with reverse polarity. By reversing the Red and Black wire on the Female connector of each LED block as 12v is sent down the wire the polarity is 'swapped over' at each LED block.. So what was normal polarity at the 1st block becomes reverse polarity at the next. And if the 1st block had reverse polarity presented to it, it would swap this over the normal polarity to the block after it. This is how I can 'selected' either Red or White with one set of wires.
Details. Step one: mark your LED blocks. They all look the same when unpowered, I turned them over and wrote WW or Red on them with a Sharpe. Then need to reverse the wiring on the end of each LED block. Take a look here, the LED on the top has been modified, the one on the bottom not.:
 |
| Can you see the difference? Top one has been modified, bottom is stock. |
 |
| How about now? Notice how the holes in the connectors have swapped sides? |
 |
| Here is a close up. The top connector has been 'turned around' |
To do this we simply need to release the clips holding the wires into the connectors, pull them out and then reinsert them back into the opposite holes. To release, look on the side of the female connector with the metal showing. There is a VERY small clip that can CAREFULLY be pressed down. Then GENTLY pull the wire out.
 |
| Using a knife tip to gently press down on the clip. |
 |
| Here both wires have been freed. |
After freeing both wires, inspect the clips to make sure it is not too deformed. We want it to 'spring back' into place holding the wire in the connector. Once ready, press the wires back into the connector, swapping Red and Black. And that is it! Now as power is sent down through this LED block it will reverse the polarity before sending it on to the next block.
Install a string of your modified LED blocks, alternating White and Red blocks to get good light distribution. Finally wire the DPDT-CO (Center Off) switch as a reversing switch:
 |
I snipped off the unused Female connector from the last LED block and used it to wire from the switch and the 1st LED in the chain, ala:
 |
| Snipped unused pigtail off of last LED in chain |
 |
| Then used it from the Switch to the 1st LED. |


No comments:
Post a Comment
Note: Only a member of this blog may post a comment.