Since that time this one posting has gathered more then 10x the hits of any other post. Clearly there is interesting in WiFi repeaters for boats (or RVs, or Homes -- it is basically all the same). This past week I had the need to assemble another repeater and there are a couple of new items available today that make the repeater much simpler and cleaner. With that I thought I would update how to assembled a high performance, low cost (around $150), and simple WiFi repeater.
In this update I am going to not repeat some of the background, as well as links to commercial examples out there. Follow the link above for that - including a few other commercial WiFi repeaters with costs ranging from $400 to over $1,000. When you are done, come back here and see how to make up as good, or better, repeater for a fraction of the cost.
This is a long post. I have broken it into several sections with click-able links:
The Concept: Overview of the architecture of this repeater.
The Parts: Makeup of the repeater, why to buy.
Configuration: Steps necessary to per-configure the components.
Installation: What do you do need to install this on your boat?
Making it Waterproof: A Bonus! Do what the Pro's have done for years to make thing all nice and tight!
A last Step: Some fine tuning to increase reliability.
Using the Repeater: At Last! How to use this day to day.
But, a Bit More!: Some options and enhancements.
Other Solutions: Pre-made solutions, in case you don;t want to roll your own.
(BTW: I MUCH prefer assembler or low level machine control C, and this is perhaps my 1st foray into HTML. If the links do not work for you, or of someone has a better way - drop me a line!)
==================================================================
==================================================================
The Concept
WiFi was designed to make that last 50-100' IP connection wirelessly. It is universally supported worldwide often with no government licensing required. Using better antennas and sensitive receivers we are able to stretch this 50-100' limit to a mile or better. This repeater will use a high gain antenna combined with a sensitive receiver* to 'receive' the WiFi single we are interested in; run this down a cable to inside the boat and then 're-transmit*' it using another hot-spot for our local use.
The real key here is the 'receiver' (more correctly called a Client or sometimes Station). It needs to have extra big ears to hear the weak WiFi signal we want to lock into, as well as a big mouth to shout back "OK, I Got it!". This updated repeater simplifies the parts uses, as well as the assemble steps; just need to 'clicked' together. Then a few simple (and one not so simple) configuration step and you are done! Here is an overview of where this is heading:
 |
| Overview of Updated WiFi Repeater. |
* I know the words Transmitter and Receiver are not being used properly here, but I though it might better explain things. The correct words are: Access Point and Client or Station.
The Parts
Like most repeaters, this one is built up around the Ubiquiti Bullet-M2-HP and a moderate gain antenna. In this update I finish up the 'boat end' with a newly released device called the airGateway. A low cost PoE injector will simplify the connection to 12v / 24v DC power.
OK, here is a complete parts list - Some of which you might already have lying around:
- Ubiquiti Bullet M2-HP $75
- 8-9dbi Omni-directional Antenna $25-55
- Ubiquiti AirGateway $19
- (Or perhaps a better: airGateway-LR for $29)
- PoR Injector $5
- CAT-5 Patch Cable - long enough to match your installation $20
- 12v - 24v DC 'Wall Wart' power brick $1 at Goodwill
- DC Power plug, fuse, and on/off switch for later wiring into 12v/24v DC boat. $5?
- 3M Supper88 Plastic Electricians tape
- 3M SCOTCH 2210 VINYL MASTIC Water-proof seal
 Ubiquiti Bullet M2-HP
The core of the repeater is the Ubiquiti Networks Bullet.
Low cost, high performance, and good sensitivity
make this item hard to beat. I still think the standard one (vs. the
Titanium series) is a good choice - it will be all wrapped up and
water-proofed below.Don't be fooled by others talking about 'marine quality', or other nonsense. What we need to make a good repeater is the ability to hear very faint signals (receiver sensitivity), combined with the ability to shout loud enough to be heard over a distance (good transmitting power). The bullet had that, and more important it is design to commercial specs (as opposed to 'consumer' specs for most all USB connected devices). This is 'Electronics Speak' meaning the Bullet is design to operate in a wider range of temperatures and also often included additional robustness in the basic design. This is the one you want.
Do make sure to get the Bullet-M2HP version. There are other variations (ala, Bullet-5HP, Bullet-2, etc) that are not what we want here. Lots of sources out there, here is one I have used: www.invictuswireless.com/M2-HP....... $78
8 - 9dbi Omni-directional Antenna
This is the other key to our system: a good antenna. In fact, of all the components the Antenna likely is the most critical part to make this system work. See - it really is all about being able to hear faint signals, and the antenna's "gain" gives us better ears. I had pointed to this one: www.invictuswireless.com/M2-HP....... but am surprised at the cost of the antenna, it already
seemed a bit high and has risen over the past years. I did a Google search on "WiFi omnidirectional
antenna N female" and came up with several hits. Don't forget to press
the google Shopping button. For example WallMart and NewEgg sell the EnGenius
EAG-2408 for under $25. Quite a savings... Typing the same into Ebay and I found many
for around $20-30.
I had pointed to this one: www.invictuswireless.com/M2-HP....... but am surprised at the cost of the antenna, it already
seemed a bit high and has risen over the past years. I did a Google search on "WiFi omnidirectional
antenna N female" and came up with several hits. Don't forget to press
the google Shopping button. For example WallMart and NewEgg sell the EnGenius
EAG-2408 for under $25. Quite a savings... Typing the same into Ebay and I found many
for around $20-30. What we are after is an 8 - 9db omnidirectional antenna with 0-degree 'down tilt'. Terminated in an N-type Female connector (to allow direct connection to the Bullet). I purchased my WiFi antenna from Ebay, and think of you can find one for the $20-30 range - go for it. If you start getting into the $40-50 range for something from China, well, just purchase one from a known supplier - ala the one above from Invictus Wireless.
At the end of this post I will offer some ideas for different options - higher gain antennas, integrated flat panel units, and more. And even some lower cost options (one down to $75 total). Each has an advantage and a disadvantage - depending on your situation some might be a viable option.
airGateway + PoE Injector
 |
| AirGateway and PoE injector |
A comment on the AirGateway: There are two versions, the standard one shown here and the LR version. Long Range includes a short external antenna. It only costs $5 more, and might be worth it. When I assembled our repeater the LR version was not in stock. I can say I am able to make reliable connections 50-70' with the standard version - so I think it works fine. But if you want a bit more local range go for the LR.
http://www.invictuswireless.com/Ubiquiti_AirGateway. . .
--OR--
http://www.invictuswireless.com/Ubiquiti_AirGateway_LR. . .
POE injector:
www.invictuswireless.com/RBPOE . . . .
** PoE: Power Over Ethernet - is a way to send DC power up to the Bullet over the same cable used to communicate with the Bullet.
Cat-5 Patch Cable
You will want to mount the Antenna and the Bullet about 10-15' above the water, and as clear from other 'things' as you can. Then you need a standard Ethernet cable to run from there down into your boat to the place you have selected for the airGateware and PoE injector. You CAN get 'outdoor' rated cable if you want (and can find it). I just used a good quality Ethernet jumper cable, black, and made sure it was mostly covered and protected from the UV. A small word of caution - recently I purchased some low cost CAT-5e cables and found out they did not use copper for the wires (I think it was aluminum). This saves some costs, but also increases the power loss when sending the PoE to the Bullet. So, if in doubt- use a local supplier that is reputable and will stand behind their cabling.12V Wall Wart Power Supply

 |
| Make sure Tip is +! |
A Word of Caution: If you purchase a PoE injector other then one I pointed to from Invictus, you NEED to verify its polarity! I am not sure what will happen to the Bullet and/or the airGateware if the ++ and -- get mixed up, but can imaging to might not be good. If the specs do not call out the PoE injector polarity, use a VOM to verify the center pin still needs to be +. Look up "PoE" on the Internet to get the pinouts of the Ethernet connector, and if on doubt - just get the one from Invictus.
- An upgraded PoE option:
- I have noted (and received) a few comments with concerns of using raw +12v to feed the PoE injector (See some of the comments at the end). Mostly I will say direct +12v feed from house batteries have been used for many many installations, both with my instantiations and most all of the 'commercial' install packages. The Ubiquiti devices happily do their job with no noted issues. However, if you are still worried about raw 12v house feed (noise) and/or voltage drop there is one fabulous PoE injector from these guys you could upgrade to:
- http://www.bitstorm.com/power-injector-duo-s15/
- Not only does it provide a stable 15v output, it also has a built in feature to enable the undocumented 'remote reset' capability in the Bullet. I have not purchased one of these devices, and do not really see a need to. But if you are so inclined this is one well thought-out device.
DC Plug, Fuse, On/Off Switch
To permanently wire the repeater into your houses DC system. All the components will work fine directly powered from a 12V or 24V battery. Take extra care to make sure the polarity keeps the + on the tip when you wire up the DC power jack; I used a test meter to double check. Add around a 2A fuse to protect things with an On/Off switch. If you scrounged a wall-wart as above you can just cut the wire and jack off of that and get your DC plug. Else make a trip to Radio Shack and pick up one. Take the PoE injector along to make sure you get one that fits correctly.3M Supper88 Plastic Electricians tape
3M SCOTCH 2210 VINYL MASTIC Water-proof seal
The last two items are actually ones you will not see on other kits.
The tape and mastic is used to wrap up the Bullet and make it even more water
resistant. There is a common concern around exposed Bullets, and there
has been cases where water intrusion fouled things up. (and one reasons
I think Ubiquiti released the Titanium series). But in any case, a good
wrapping is what the "Pro's" have done for years on cable telco
and other RF outdoor systems. No matter what you end up purchasing,
consider adding this step to your installation. (and BTW, this is not
too bad of an idea for any exposed RF connectors. I wrapped out AIS
antenna in the same way, while our VHF antenna connector was already
inside a weather protected sleeve.)
And do NOT skimp on the Super88 plastic tape. It does cost more, but is well worth it. The 2210 Mastic is the key to making waterproof enclosure between the Bullet and the Antenna, as well as the Cat-5 cable. (And why I do not think the Titanium bullet is needed - its all going to get wrapped up anyway). It might be available at a Big-Box store, or mail order. Comes in 10' rolls for around $50 so unless you are going to do a LOT of these you might see if someone wants to go in with you. I ended up being able to purchase some by-the-foot at an electrical supply house.
And do NOT skimp on the Super88 plastic tape. It does cost more, but is well worth it. The 2210 Mastic is the key to making waterproof enclosure between the Bullet and the Antenna, as well as the Cat-5 cable. (And why I do not think the Titanium bullet is needed - its all going to get wrapped up anyway). It might be available at a Big-Box store, or mail order. Comes in 10' rolls for around $50 so unless you are going to do a LOT of these you might see if someone wants to go in with you. I ended up being able to purchase some by-the-foot at an electrical supply house.
The Configuration
Here is perhaps the hardest part of rolling your own vs. purchasing a pre-made kit. We need to configure both the Bullet and the airGateway from their as-shipped default configuration... It is not hard, and I have included screen shots for each step. But it does take a few steps. Lets get started.
In short, we are going to configure the Bullet to act as a 'receiver' for an access point some distance away, and configure the airGateway to provide a local WiFi hot-spot on our boat re-transmitting that distant station. Once that is done we can connect them together, do the install on your boat, and then make some final tuning changes. From that point on you are done and ready to tap into WiFi's around the world!
The Hard Part.
I have been saving this one for a long as I can. There is one step that is, to be honest, not so straight forward. Being as the Ubiquiti devices are design for light commercial installations, as opposed to simple consumer installs, some things are a bit fiddly. And here is one: In order to be able to 'talk' to the Bullet and initially configure it, we need to temporarily configure your computer for a fixed IP address... In Ubiquiti's own words:- Make sure that your host machine is connected to the LAN that is connected to the Bullet.
- Configure the Ethernet adapter on your host system with a static IP address on the 192.168.1.x subnet. (e.g.: 192.168.1.50)
- Launch your web browser. Type https://192.168.1.20 in the address field and press enter (PC) or return (Mac).
OK. Step by step. First off you need to figure out how to 'Configure the Ethernet adapter in your host system with a static IP address on the 192.168.1.x subnet'.. Each computer / OS will be a little different. Google up "configure
Once you find some instructions that make sense to you, you might want to print them out - as once we do this change your computer will no longer be able to access the Internet. Also, take good notes on what you did as you will want to 'undo' them once the Bullet is configured. And do not worry, this is a one-time thing! Once we get the Bullet initially configured, there will be no need for these manual steps.
No matter which set of instructions you follow you want to make sure you set the IP address of your computer's hardwired Ethernet socket to: 192.168.1.50 (It needs to be the wired Ethernet socket, not some other adapter - ala a WiFi adapter, that we change). The link above used 192.168.2.2 and 192.168.2.4. Those will not work for us. We need 192.168.1.50 - just follow the steps by step guide, but use 192.168.1.50 every time they call for 192.168.2.2 or 192.168.2.4! All the other steps and numbers are OK to use.
Here is a winXP only example that does exactly what we want: http://www.hotcomm.com/FAQ/FAQ_staticIPXP.asp Skip down to the "Assign the IP address part"
Simple, right!
And for win7, here is a snapshot of what you might be looking at:
 |
| Example print-screen of setting a Win-7 computers Ethernet adapter IP address to 192.168.1.50 |
Once we have the computer set up for a static IP address we need to to isolate your computer from any existing network. Turn off the WiFi, and / or disconnect any Ethernet cable coming into your computer.
Now we can get down to actually doing the per-configurations.
Pre-configuring the Bullet
In these steps we are going to turn the bullet into a 'receiver' (more correctly, a 'Station'). To do this you need to run an Ethernet cable from the bottom of the bullet to the socket on the PoE adapter. Plug the other end of the PoE adapter into your computer and the 12v power brick into the DC connector. It should look something like this:
The Charcoal Gray Ethernet cable on the left goes to the Bullet, the PoE in the middle plugs into the computer on the right, and the 12v DC power cable coming in on the top. Open up a browser on your computer and type in:
https://192.168.1.20
This will bring you to the Bullets configuration screen. But before that two quick notes:
- It is likely you will get a warning about Rome Burning on your computer - This is an SSL warning, and it is occurring because the Bullet is telling the computer 'I am safe', as opposed to some outside trusted 3rd party (remember we cutoff the Internet to to your computer??). Your computer is designed not to trush things that themselves say 'I am OK', so the warning.. As we know the Bullet can be trusted, click Proceed Anyway to continue. (If you want, most browsers have a way to add an SSL exception - you might want to do this later to eliminate having the click Proceed Anyway each time you log into the Bullet and/or the airGateway.)

SSL Warning - It is safe to click Proceed Anyway. - In the following examples you might notice the upper left hand corner talks about a Loco NanoStation instead of a Bullet M2-HP. At the end of this posting I will talk about some options, one of which is the NanoStation. The steps are the same for the Bullet and the NanoStation - so just follow the slides and think Bullet when you see NanoStation!
Once you get past the Warning the initial log-in screen will be shown:

When 1st logging into the Bullet after a factor reset there are a few extra items to fill in, like the country you are in and your agreement to their Terms... Enter UBNT for both the Username and the Password. Select the country you are in ** and your preferred language. Click the I Agree button and you will then be taken to the summary screen.
** Note on Country - Read more about this at the end of the posting. But for now, the 'safe' way to configure your Bullet is to match the country you are in. Hint: Most Flexible is to select Australia!
After logging in you will see the initial summary screen, the MAIN tab:
 |
| Initial Bullet summary tab, after you have logged in. |
You can click on the Dismiss button in the orange window at the bottom right, we will get to changing the password in just a bit. But 1st, click on the NETWORK tab, which will bring up this screen:
 | |||||
| Initial Bullet NETWORK tab, before we make changes |
We want to make a few changes here, do these steps - in order:
- Change Network Mode from Bridge to Router.
- In the 'WAN Networks Settings' section, check the NAT - Enable box.
- In the 'LAN Network Settings' section, change the IP Address to 192.168.37.20
- In the same area, click the Enable button on the DHCP Server
- And also in the same area, change the Range Start to 192.168.37.100
You should now see something like this:
 |
| Bullet NETWORK tab, after we have made configuration changes |
Note that as before I am moving the the Bullet away from the common IP address block of 192.168.1.x (as well as 192.168.0.x) and instead using 192.168.37.x I do this as I continue to have difficulties if I happen to connect to an external WiFi which uses the same subnet block range as the repeater. Things just do not work well. And by moving to a subnet range that is unlikely to be seen (192.168.37.x in this case) I reduce greatly the risk of running across an external WiFi Access Point which uses the same range...
Moving on, press the SYSTEMS button to bring up this screen, and we will now change the password:
 |
| Update the Password by clicking on the 'Key'. |
If you look very
closely there is a small key-shaped icon just to the right of the 'Administrator
Username' box (the one that has ubnt in it). Click on that 'key' and you will prompted to enter the old password (ubnt), and a new password of your choosing.
Do that now. If you want, you can also change the username from ubnt.
After you have entered your new password and pressed OK, go ahead and press the Change button on the lowerish right hand side - and as we are NOW all done - you can also press the Apply button in the Blue Bar.
That is it, you have completed the pre-configuration of the Bullet. Return your computer to its prior state by undoing the static IP address we did above. Unplug the PoE adapter from the computer as well as the Bullet, and also re-enable to WiFi on your computer. Once all this is none, lets move on to the next step, and airGateway.
Pre-configure the airGateway
With your computer more or less put back to normal (ala, un-did the static IP address / re-enabled the WiFi) we will now focus on the airGateway. This will be much simpler and we can even do it wireless! But 1st we need to get power into the airGateway. Unplug the Ethernet cable from the PoE injector that is leading to the Bullet and also from the computer, but leave the 12V-dc power cable in place. Then if you look closely on the 'back end' of the airGateway there is a kind of Ethernet plug built into it. We want to plug this into the socket on the PoE adapter, kind of like this: (But do not at this time plug in the cable up to the Bullet, that comes later).
 |
| airGateway getting it 'Power' ! |
Once you have sent power to the airGateway give it a few seconds to wake up. Using your computers WiFi tool look for a wireless network with the SSID of 'www.ubnt.com'. This is the default name for the airGateway; go ahead and connect to it. Then open your browser and type in https://192.168.1.1
You will again get an SSL security warning message. As before click Proceed anyway to get to the initial login screen. As before, enter 'ubnt' for both the username and the password, select your country and language, check the I Agree box and click the Login button - you will be taken to a small 'wizard' overlaying the main screen tab:
 |
| airGateway Wizard, we will not be using this - so click the Cancel button. |
We need to make a few more changes then the Wizard will allow, so click the Cancel button and we will go step by step. After clicking Cancel, click on the Wireless tab.
 |
| airGateway Wireless settings configured. |
Change the SSID to something meaningful to your boat (I used Viking Star on our boat - and here I used Johnson). By default WPA2 encryption is used, enter the password you want. You can disable wireless security if you want with the enable/disable pull down box. Your choice. Pressing Change in the lower right hand corner will bring up the Blue Bar, as before we will NOT press Accept until we complete out changes.
Move on to the NETWORK Tab. We need to do three things here:
1) Change the Network Mode from SOHO Router to Bridge
2) Change the Management IP address button from DHCP to Static
3) Assign a fixed IP address of 192.168.37.10
 |
| Configured NETWORK tab on the airGateway |
Again, press the Change button but hold off on the Apply one. Move on to the System tab.
 |
| Enter a new Password, press Change and then Apply. |
That is is for the initial configuration. Lets move on to installing your new WiFi repeater!
The Installation
You want to mount the Bullet and the antenna outside about 10-15' off the water. Find a good place as far away from other electronic antenna's as you can, and mount the Bullet. To be honest, here is where some of the commercial kits help out. At least one of them has made a special adapter to allow the antenna and Bullet to be screwed directly into a standard 1" antenna post. Lacking this - most antennas you get will use clamps. As with most things on a boat, time to be creative!
Once the antenna is mounted screw the Bullet to the bottom of the N-type connector. Firmly, but not over tightening. Then the CAT-5 cable goes into the bottom of the Bullet. Route this cable back into the boat, protecting it from sunlight as much as you can, to where you want the airGateway to be located.
Plug the CAT-5 cable into the airGateways socket labeled POE. Then plug the PoE adapter into the nub on the back of the airGateway - I used some electrical tape to make sure it was held on well. Also put some tape over the exposed Ethernet plug on the PoE injector, we will not be using that and want to make sure there are no accidental shorts.
Connect up the +12v or +24v DC by your house batteries, or if you want you can instead continue to use the Power Brick used during initial configuration. If you wire to your house batteries, make sure to add in a 2A inline fuse and an on/off switch. And finally put a wrap of electricians tape around the DC connector on the PoE injector- to make sure it does not come unplugged.
And there you have it! Just a few loose ends to clean up and you will have a WiFi repeater that preforms as well, or better, then commercial per-packaged systems for a fraction of the costs. But 1st, a couple loose ends.
Making it Waterproof
Some time ago I captured these steps written by Bob Hrbek on how to
properly tape up an external RF connector. The way the Pro's have done
things for years on RF installations. His website is gone now, but I
saved a copy and here is the gist of it:
- Use the Supper88 tape to make 'Courtesy Wrap's directly over the antenna connection and the place where the CAT-5 wire comes out the bottom. This is just a couple of turns of the tape which will aid in un-gunking things if (when) you need to open things up in the future for servicing. Do not go wild on this, just a single layer a couple of tape widths wide is sufficient Some folks put the tape on backwards (sticky side out) to work even better.
- Using the SCOTT 2210 mastic to cover everything up. Starting about 2 inches above the top of the Bullet antenna connector to a couple of inches below the CAT-5 cable. It is a self fusing tape, pull it firm, make about 2 layers, and then mash it all together into a fused ball.
- Cover it all up with two wraps of the Super88 electrical tape from bottom to top (Always start at the bottom if you can). Making sure to go a bit higher on the antenna and start lower on the CAT-5 cable with each wrap.
A last Step
There is one more last-step we want to take before calling it done. We want to enable the Bullets Watch Dog. The reason for this is it will give us a simple way to 'reset to factory state' the Bullet if something ever goes sideways. Of course, another way to to climb up the mast, unwrap all the waterproofing and press the Reset button on the bullet. But I think the Watchdog is much simpler...
Power on your new repeater and give it a few seconds to power up. Using your computer search for the new wireless network you set up when configuring the airGateway (Johnson in my case). Select it and enter any password / security key. This is just like connecting to any other WiFi network..
We want to get back to the Bullets management screen, so open a web browser and type in:
https://192.168.37.20
The address we 'fixed' the bullet at. If you have not added an SSL Security exception to your browser you will get that SSL warning. Click on OK to proceed (as you will often be going to the Bullet - you really might want to figure out how to add a permanent exception for your browser. Each is different, try searching for SSL Exception and your browsers name).
Go to the Bullets SERVICES tab. On the top left is the section called Ping Watchdog. Make the following changes:
1) Check the Enable box next to Ping Watchdog.
2) Type in 192.168.37.10 for the IP Address to Ping
 |
| Setting up the Watch Dog on the Bullet |
If you recall, 192.168.37.10 is the address we put the airGateway at. As long as the Bullet is able to 'see' something at 192.168.37.10, all will be OK. But if it every fails get a response when 'pinging' 192.168.37.10, the bullet will reset its self to the factor default. After 3 failed tries 300 seconds apart (or about 15 minutes).
Go ahead and press the Change button as well as the Apply button that will appear in the Blue Bar. That is it! If down the road you have some reason to reset the Bullet, all you need to do is press and hold the reset button on the airGateway for 10 seconds. That will reset the airGateway to its factory default (which was at 192.168.1.1); the Bullet will no longer get a response to its Ping requests, and after 15 minutes the bullet's Watchdog will timeout - resetting the Bullet to its factory state. Then you can start all over with the Pre-configuraiton steps!
Using the Repeater
Wow. We have installed our nice new repeater - how do we use it? Rather simple. Power it on and connect to the WiFi name you set up for your boat (Johnsons in my example). Open a browser and type in https://192.168.37.20 to gain access to the Bullets management screen. If you still have not put in an exception for the SSL error, go ahead and click through the Proceed button to get to the main screen and the select the WIRELESS tab. Click on the 'Select' button to the right the box labeled SSID and the Bullet will do a site servery of all WiFi networks it can see. This is what I got with one servery:
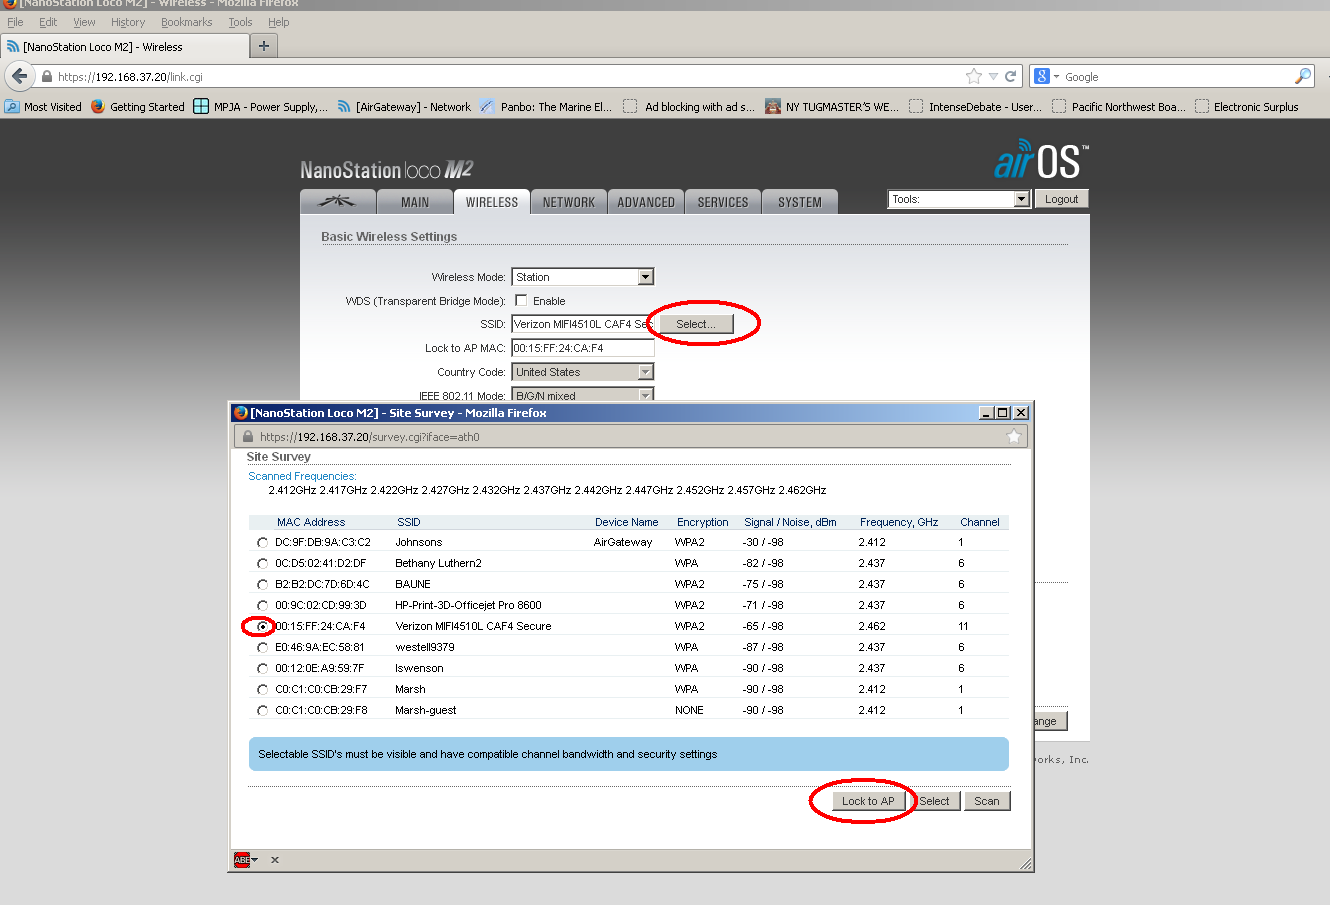
You can see not only the new WiFi we created for our local use (Johnsons), but also any other WiFi in about a 1 mile radius. Click the circle to the left of the network you wish to use and then click the Lock to AP button. You will return to the WIRELESS tab. Enter any needed security information for this WiFI you are attaching to and then press the Change Button on the lower right. The Apply button that will appear on the blue bar. Click Apply. After several seconds you will be returned to the MAIN tab where you can monitor progress of the bullet trying to attach to this remote WiFi.
Oh, less you get the idea that the above photo and site-survey seems to be kind of skimpy, not showing too many access points. I should point out I am setting up this repeater literately in the middle of the country - the SW corner of Minnesota! Let me tell you - in the small town we are in (population 200 or less I am sure), that is a good survey. Plus, I was doing it from my 'guys den' down in the basement. If you want to see how this type of system would preform in a more common location, look at this scan I took from Friday Harbor:

There are over 50 access visible. Just using my computer (without the repeater) I was able to only see 4 of them... This is all because of the external antenna gain, and the Bullets good sensitivity.
All Done!
Assuming you were successful in attaching, that is it! You are connected and ready to rock! If the connection failed, do the site servay again and try a different WiFi. (also, make sure you have the correct security code if used).
These days it seems there are less and less open (unsecured) WiFi's out there, but there are a few. We find the repeater invaluable during those few times we come into port and the marina has 'WiFi' - all too often the marina's WiFi setup is not very good, often useless directly by our laptops. But by using the repeater we are able to lock into an access point with a strong connection. Which brings up a point.
You will notice in the above instruction I suggested clicking the Lock to AP button as opposed to the Select button. We have found that often Marina's will have more then one access point, all with the same SSID. If you click Select, the Bullet will look at all the access points with the same SSID and select the one with the strongest signal. That sounds nice, but we have ran into situations where an access point has gone rouge. Being able to lock into a specific access point, even if it is not the strongest, allows us to bypass any failed accessed point in the marina. Also, when we were in Friday Harbor, they had a 'mesh' WiFi in place. Using the Lock to AP capability we were able to reach across the marina and 'lock onto' the entry point of the Mesh. Kind of cheating, but in this way we could make sure we were 1st in line when it came to being serviced by the WiFi. This gives us better speed and reliability of Internet access. :-)
There you go
OK. I hope some people find this update useful. And as before, if you have some ideas for making the configuration simpler - please drop me a line! Until then happy WiFi-ing!
====================================================================
=====================================================================
But, a Bit More!
There are a few additional things you can do to improve performance and/or fine tune your setup to your situation. Such as:
- Reducing Channel Conflicts
- Alternatives to the 8 - 9dbi antenna
- Alternatives to the Bullet M2-HP
- Selection of your 'Country'
- Undocumented Bullet remote reset feature.
Reducing Channel Conflicts
WiFi is a standard that has mostly been adopted worldwide. Part of the standard is assignment of frequencies and named 'channels'. Here is a graph that shows how these 'channels' are mapped out in the RF 2.4Ghz spectrum (the most commonly used one):
You might quickly notice the channels seem to overlay, and you would be right. As a result, it is common to use channels 1, 6, and 11. You will see this grouping in any site survey you do. Why is this important? Well, with the Bullet we are attempting to isolate a very weakWiFi signal from a distant Access Point. It is kind of like like two people on opposite sides of a crowded room trying to talk with each other. With all the background noise going on, they each need to speak louder as well as perhaps cup their ears to try and hear better. We are doing the same things - speaking louder with the high transmission power of the Bullet, and listening better with the high gain antenna. (BTW, of the two - the listening is vastly more important)
While all this is going on lots of other things are making noise - might be other WiFi stations, might be some source other then WiFi (the frequency is part of an 'unlicensed' spectrum - so things like cordless phones, remote control toy cars, etc all use this same set of frequencies) Given the Bullet is trying its hardest to hear above the 'Noise of the Crowd' - if we end up having out local WiFi network (the one we set up using the airGateway) at the same frequency as the far away WiFi access point we are trying to listen to - well, we are just adding to the noise. Look again at the site survey I initial did:

Notice how our new network SSID:Johnsons is on channel 6, as is other WiFi access points I might be trying to connect to. So, in this case I would be best to move Johnsons away from channel 6, the common choices being 1 or 11. Both Channel 1 and 11 are used, but the signal's strength of the WiFi on channel 1 is very low, indicating that is far away. So I will move to Channel 1.
Opening up a browser and type in https://192.168.37.10 (the address were we placed the airGateway). Click past the SSL error screen (you might want to add a browser exception for this as well), enter your new password and get to the main screen. Click on the WIRELESS tab. In order to change channels we need to change configuration mode from Simple to Advanced. Once that is done, in the Frequency, Mhz box enter enter the frequency of the channel we want to use (referring to the table above). As I want to use Channel 1, I entered 2412 Mhz (same as 2.412 Ghz). Press the Change Button and the Apply button. Once things reset and settle down, go back to the Bullet and do another Site Survey. Now you will see your local access point on a channel that is no longer adding to the confusion.
Each time you lock into a new remote access point you would consider moving your local channel away from the one your locked into. WiFi is designed to share a channel, so if you have a good strong connection to the remote WiFi - no need to go through this step. But if you find your remote WiFi access point is a bit 'in the weeds' so to speak, making sure you local AP is not adding to the noise floor can be helpful.
And btw, this is also why I separate the Bullet and the airGateway by several feet. Even if they are on different channels, having the two devices right next to each other does not help. That 15-20' between them does!.
Alternatives to the 8 - 9dbi antenna
I have suggested using an 8 - 9 dbi omni-directional antenna. When working with close by stations (ala, under a quarter of a mile) this is a good choice. We need to make sure the antenna can 'see' the remote access point we are trying to attach to and there is a good chance it is higher up on land. Now, it is very true that a higher gain (like a 12 - 15 dbi) antenna would give is a much stronger set of ears, but there is also the risk that the higher gain antenna - because it 'flattens out' the window it looks at - might no longer be able to see a station that is up on shore. In effect undershooting the station. Throw in some rocking, and well. This is the same issue as with Sail Boats and high gain VHF antennas.However, others have reported that they have had NO issues with a 12 - 15 dbi antenna. I can see how this would be VERY TRUE of you were anchored off shore a bit. And in fact, in such a situation the higher gain antenna would be very helpful with its even better ears. Being further way there is far less risk of being outside the 'antenna window' (ok, go back to High school trig - remember what happens when we increase the base of a triangle?). If you spend most of your time not in close, you might want to give a 12 - 15dbi antenna a try. And even if you are in close often these cut-off windows are not engraved in stone. Lots of reflections and such occur, and any loss from undershooting might be counted by the vastly greater receiver gain of the antenna. If anyone has experience in this, perhaps they could leave a comment?
Side note: If you do use an antenna with a gain greater then 8 or 9dbi, make sure to read the section below ' Selection of your Country'. Three are some additional steps you should be aware of to keep things legal...
Alternatives to the Bullet M2-HP
Along the same lines as using a higher gain omni-directional antenna - there are also a whole selection of directional antennas out there! Using exceptional high gain and very directional antennas (on BOTH ends) some people are able to send and receive WiFi over many many miles. Of course, the problem with a directional antenna is of you are at anchor and are swinging around..However, if you are using this only while tied to a dock that swinging around things goes away. And you could use a direction antenna. Going back to my crowded room analogy, using a directional antenna is like putting up a wall behind you - cutting off any noise from folks behind! If in the middle of a noisy WiFi environment (ala, in a city where you can see 100's of access points using an omni-directional antenna), switching to a directional one to 'weed out' all those stations behind you that you do not care about can give a great head start.
You can purchase directional antennas that attached to the Bullet. -OR- you can purchase a unit that basically combines the Bullet with a built in directional antenna. Such as the Ubinquiti Nanostation 2, a Bullet with a built in 11dbi directional antenna: http://www.invictuswireless.com/Ubiquti_NanoStation2. . .
In the example screen shots above I used a slightly lower power/lower cost Loco (Low Cost) Nanostation. http://www.invictuswireless.com/NanoStation2_Loco... Using this Loco option I put together a very usable directional repeater for under $75. This design would be VERY usable in a marina or RV park where you are trying to lock-in their in-park WiFi!
So you see, there are lots of options out there.
Selection of your 'Country'
Earlier I talked about standards around the world - how most all countries agreed upon the frequencies and make up of WiFi. Though that, and more, is true there is one key area where many countries differ - how much power one is allowed to use. A new 'feature' of the Ubiquitis AirOS is they ask which country you are in when you 1st log in after a reset-to-factory state. This is because AirOS now includes a LOT of smarts about what you can, and can not, do in a given country. Again mostly around the maximum allowed radiation. If you look at the Wireless tab, you will see there is a place to enter your external antenna's gain (on the Bullet, the NanoStation has that already filled in). It is there because antenna gain adds to 'transmitted' power. In the WiFi world it is common to use dbi as short-hand for talking about transmitting power. The Bullet M2-HP has a 400mW transmitter, converting to 26 dbi. If we add an 8 dbi antenna, and take back -1dbi due to loss in the connector we get 35 dbi. This is one dbi under the max power limit in the USA (36dbi).However, if we were in Europe - their limit is 20 dbi! So, if during start-up you had entered France for your country, and been honest and entered 8db for your antenna - AirOS would have automatically reduced the Bullet's transmitting power from 400mW (26dbi) to 13dbi - or about 20mW... 13 + 8 - 1 = 20 dbi
And AirOS would have been justified to do that. Having someone going around with a Hot WiFi can just wreak havoc. Going back to the party example, imaging how things would go if a couple of folks came in with bull horns and started talking to each other across the room!
Another common area that is looked at when you select the Country you are in is how to handle WiFi Channels 12, 13 and 14. Not all countries allow those frequencies. The USA does not while Europe allows 12 and 13, and Japan will also allow some use of 14...
If you want to Play nice, select the country you are in and AirOS will automatically make sure you are within the limits. But if you do not really want to play nice, or want the option to make your own decisions - then when 1st logging into the Bullets set up screen - choose Australia. See, those guys down under allow the full 36dbi of power (like the USA), as well as allow channel 12 and 13 (like Europe). Kind of the best of both worlds..
AND - if you have gone ahead and added an antenna with more then 8 or 9 dbi gain (like a 16 dbi monster), take care on the WIRELESS tab to enter the correct information and/or be aware that you will be waving a really big bull horn.
Undocumented Bullet remote reset feature
Lastly, it turns out the Bullets have an undocumented feature to do remote
resetting. This person figured it out, and it involves placing a
voltage of 14-15v or more into the communication lines of the CAT-5
cable. http://dren.dk/mreset.html
Handy to know in case the Watch Dog timer trick does not work. I also had issues with the built in PoE injectors in the Linksys WRT54G that triggered this; see my 1st post to read more...
====================================================================
=====================================================================
Other Solutions
There are several alternatives out there, ranging in price from $400 to over $1,000. As well as some USB based solutions that can deliver good performance for a single computer. Here are a few:Pre-packaged Repeaters
www.wavewifi.com. For about $375 you get a complete kit with all the parts, including a router! One of the other reasons I like these folks is they have gone in and simplified the Bullet firmware, making it simple to setup and use their system. Almost all other 'kits' out there leave the default Ubiquiti firmware in place, which can be a bit overwhelming. WaveWiFi has done a great job in simplifying everything.ww.islandtimepc.com/marine_wifi.html. Their offering is the basic stuff, no extra firmware and is no different than what you could purchase independently - ala above. But it does all come at once, and they have some creative antenna mounting solutions as well. Starts at $250, more for different antenna mounts and optional router.
http://www.bitstorm.com/ Maker of Bad Boys Extreme and Unleashed - these are again Ubiquiti bullet (and other products). Odd name, but solution looks good. It appears they have developed a custom PoE that not only regulates power, but also provides a way to access that 'undocumented' reset feature mentioned above remotely. Combined with custom/modified firmware to make usage simpler. And they even have some different antenna mounting bracket solutions. A bit spendy at $349, and does not include a local router ($149 option - for total of yikes: $500!). But otherwise it looks like a nice setup with a couple of really nice features.
www.thewirie.com/index.html
April 2015:
OK: TheWirie has stopped selling their Alps based unit and now offer a Bullet based one called "The WirieAP+". So all the above caution about temperature ratings no longer apply. The new The WirieAP+ is Bullet based AND has a nice user interface. $399 - Worth a look.
USB based solutions
There are a few offerings out there that are USB based, and a key advantage of them is simple installation - just plug them into a USB port on your computer and use the computers / OSes built-in capabilities for selecting and locking into a distant WiFi station. I have not looked too deep into these as a key lacking of USB solutions is the inability (or perhaps extremely difficulty) of supporting more then once computer on your boat at a time. (No way my Wife is sharing her Face Book time with me!). Plus, comments above about Temperature range should be considered. Even so, very viable solutions for getting that Long Range Fix. Here are a couple of solutions I have seen:SuperPass WiFi Extender (http://www.ebay.com/.../SuperPass-MIMO-OMNI-Wireless-N.....) This was passed on to my by someone I know who has used it for a few years with great results. Specs look good (sensitive receiver, good transmitting power, high gain antenna). Made in Canada they seem to sell only via an Ebay store. If link above is broken, try Googling "SuperPass MIMO OMNI Wireless N Range Expander Repeater"
Wok-Fi. Alright, don't laugh on this, they really work! Take a USB WiFI addapter and tape it into the middle of a chineese cooking basket and Vola, you have a VERY low cost, rather good WiFi extender. Scrounge up one of those discarded Dish satalight antennas and you can get a system which will really surprise you! Of course, they are directions. But a little time on Google will turn up tons of these, ala:
http://www.usbwifi.orconhosting.net.nz/
http://www.instructables.com/id/EC0S9C3F0HPZCGN/?ALLSTEPS
http://www.ab9il.net/wlan-projects/wifi3.html
Most all of these USB solutions will need a USB extension cable. If over about 5' you need to search for an 'Active USB' extension cable, ala: http://www.ebay.com/.../16-USB-2-0-Active-Repeating.....

This comment has been removed by the author.
ReplyDeleteFirst off, thanks so much for putting this up. I followed the instructions here and am now happily connected everywhere.
DeleteI did want to ask you about the power options. I opted for a ubiquity 24v poe adapter. The passive adapter you listed here says it's for 12 - 28v applications, but states it needs a minimum of 18v input to deal with power loss over the cable, and the bullet itself is a 24v device. Are you sure this will power the bullet properly on a 12v system? Won't the voltage difference damage the device?
Also, would you be willing to share what hardware you used to mount the antenna?
Thanks again!
Hello, and thank you. I am glad you found this of help and got your WiFi repeater working! On your two questions:
ReplyDelete1) I found the Bullet will work down to 8v or so. It is very hard to get specs out of them, but all I can say is I have not hand an issue in several years of usage - often on battery (and remember I also have that 1.2v diode to overcome an issue with the Linksys router I used - see the 1st posting). One thing to remember is the CAT-5 cable we are using is rather short, vs. the Ethernet spec of 100m. If we had the 100m cable voltage loss would become a bigger issue. But at say 10m or less, the loss is less of an issue. Clearly the 24v PoE is a better solution for the reasons you mentioned - it does require you run an inverter somewhere though.. But if that extra power draw on your house batteries is not a problem, then there is no downside using the 24v poe adapter.
For me, if I ever start having issues I will add a 12v --> 24v DC-DC convert (lots of them on Ebay for under $10), 'upgrade' my Linksys router and then be able to run the repeater w/o firing up the large 120v inverter.
2) Mounting: The antenna came with two U-Clamps. I found an existing flat plate on the old TV antenna that I could drill holes into and bolt the U-bolts to. Just make sure to put the U-Bolts around the base of the antenna, NOT on the bullet! I am not at the boat right now, so can not take a photo.
Wish I had a better answer for you - I think in the end it takes some 'thinking time' to get the right solution :-)
Hello again. Today I sat down and calculated up perhaps a better answer..
ReplyDeleteThere is no min voltage called out in the bullet spec sheet. However many boards suggest Ubinti recommends 12v min, and an abs min of 10.5v. The Spec sheet does call out that it draws 7w max (approx 500mA on a 12v feed). Measurements tend to come in more like 300mA @ 12v
CAT-5 Ethernet cable is limited to 100M max length, it also has a spec of < 0.188 ohms / wire / meter. PoE uses two wires in parallel - out and back. Combining this with the 7w Bullet gives a voltage drop of 9.4v! No wonder one needs to put in 24v if we want to get anywhere near 12v out the far side..
Now, more practical example: Our feed is likely limited to 10m (33 or so feet), and the typical resistance of 24g wire is 0.086 Ohms/meter. Putting this all together the expected drop comes to only 0.4v drop, even at 7w. More like 0.2v drop using a measured 300mA.
So, that is why we are OK feeding the Bullet directly from the 12v batteries. Even with low battery charge state (12.2v), we likely will still deliver 12v to the bullet. Even going to the 7w max we are better than 11.8v, still above the 10.5 abs min.
And if anyone comes up with creative ways to mount their antenna, and wants to drop me a photo I can add it to this to share with others!
Does this take the place of a router or do you connect LAN on Airgateway to LAN on default setting router? I'm thinking about network printer, and other devices.
ReplyDeleteThanks for sharing,
Bob
DeleteBob, Thanks for taking the time to wade through all this! You should be able to plug one CAT-5 based device directly into the LAN port on the AirGateway and have it participate in the 'boats LAN'. I have at times connected my laptop in this way to do servicing if the repeater.
If you need more then one hard-wired device you could connect a low cost 'Ethernet Switch' (under $15 at Office Depot and I am sure others) into this same LAN port to expand the number of ports. I would make sure to use a simple 'Switch' or 'Hub' for this port expansion, as opposed to a 'router' - as that will add a level of complexity. Just let the 'router' function in the Bullet handle everything.
Another idea is to not use the AirGateway and instead re-purpose an old WiFi 'router' you might have laying around. Example, if you click on the old link a the top of the page (http://mvvikingstar.blogspot.com/2012/11/wifi-repeater-for-boat.html) you can see how I configured and used an old Linksys WRT54G instead of the AirGateway. It is what I am actually using today on Viking Star, and it gives me the local WiFi on the boat (the 'repeated WiFi') as well as 3 additional hardwired ports that I can connect to fixed items, ala the Nav Computer, hardwired printer, etc.
Either way should get you what you are looking for.
Thanks, I had a setup on my previous boat modeled on your instructions and it worked well. The new boat has a Nano Station2 and I had to start over and it has been a trial with a Netgear router. I thought this would solve the problem but have since have finally gotten it working. The only thing different is that it works on the wan but not a lan connection.
Delete