Upon closer inspection I also noticed signs of bio-growth on the flow gauges Just a little in the corners. And the bottom of the production tubes had a bit of brown to them. It got me thinking - the way we boaters 'pickle' our system is to circulate preservation through the membranes. We even have two turn-outs to simplify this (See Flush in and Flush Out in the diagram below) . It is a very common to see this type of setup for small water-makers - heck some suppliers even sell special pre-filters that contain the needed chemicals to make it even simpler.
.But it got me thinking - this all-to-common procedure has a MAJOR lacking - it only treats the sea-water side of the system... There is no way treatment will make it across the membrane into the produce side. And I think that might be part of what has caused our reduced output - Bio fouling in the fresh water side.
So I made a simply modification to allow for treatment of the production side, ala:
 |
| Improved design with Fresh Water side Flush Note also relocated heater-exchanger to pre-heat water |
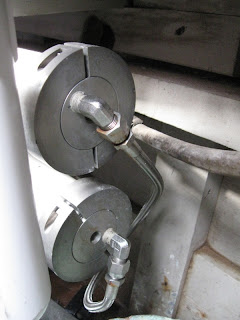
To make this change removing the pressure tube end caps, drilling out the output hole (Or remove plugs, depending on your system), and installed the new valves and hose .
 |
| Original installation, note production side(hole in center of cap) is not connected on this end of the pressure tubes. |
 |
| And here is why, the hole is tapped, but not drilled through. |
 |
| Careful to drill out |
 |
| And add individual valves. (Note the Lye-In-Waiting in the background!) |
 |
| And the rest of the parts needed to complete a "Fresh Water Flush" |
With this change I can treat teat the Salt Water side, and then treat the Fresh Water side. It seems an obvious lacking in most designs, and I am looking forward to cleaning the system this spring - both sides. And a protection of ALL PARTS of the system when it is placed into storage next fall.
(And if you want to see more about Viking Star's Water-maker, click on the Watermaker link to the right)


No comments:
Post a Comment
Note: Only a member of this blog may post a comment.