SELECTION CRITERIA
Need to state first off – Viking Star is a “Trawler”, and as such I considered a system for use inside the pilot house. If someone wanted to extend this to outside – either on the fly-bridge or perhaps onto a Sail Boat then one would need to consider primarily the display (weather proofing and daylight visibility). In either case the CPU could still be remotely mounded in a semi-protected area. Further, on a Sailboat one could simply have this whole thing down below at the NAV station with or without a remote waterproof display at the helm. And also a node to Sailboats - I have not considered the power needed to operate this. While running, Viking Star’s 270A Leece Neville house alternator is more than capable of covering any power needs. But this is not to say I went over the top either!
Some challenges for a computer installed on a boat include:
- Poor power quality – ‘12v’ is more like to range from 8v up to 15v or more. Plus there are all sorts of electrical noise and junk on the ‘12v’ feed.
- Environmental extremes: temperature and salt air come to mind.
- Sub-optimal mounting situations: Not always true, but it might be tempting to mount the CPU in the back of a locker – with little ventilation…
- Vibration –from the motor and other machinery, but also from wave action.
Balancing this one needs a solution that is:
- Reliable
- Responsive
- Low Cost (At least this is one of my goals).
All of these points are a marketers dream(well, perhaps not that last one) – just think of the copy one can create around the need for special Marine Specific equipment. And the $$$ that comes with it. As such this left out dedicated chart plotter systems for us, as well as the purposely built “Marine PCs” available on the market.
My first approach was to use a dedicated laptop connected to an external monitor. This approach worked well for several reasons:
- Laptops are fully integrated and able to be powered from an external DC power supply (I used a Targus Car adapter)
- Having a dedicated system meant I could load ONLY navigation software on the computer, eliminated any possibility for Viruses and other software based crashes.
- I was able to source good quality refurbished laptops for under $400 (and this pricing is now approaching $200)
- Laptops are designed for vibration – some even feature HDD protection for then things get too rough.
I connected an external LCD monitor to the laptop, closed the lid and tucked the whole thing away in the overhead. Adding a extra cooling fan, a remote DVD drive (via USB), a USB extension cable for pluggin in a keyboard (when I needed it) and Thumb Drives to transfer charts and such, and a wireless mouse. This worked well for many years, but I did notice the HDD protection would often be triggered by waves (3’ or higher), and as such I had to turn off that feature. It was stable, fast enough for chart work and even had sufficient power to play DVD movies!
All went well until Portland suffered a week of 100+ weather. While watching a movie one hot afternoon there was a ‘Poing’ sound and all went dark. Rebooting, no help. Power cycle, no help. Letting it sit for an hour, no help. It was dead. And,. BTW, the next day the same thing happened to my personal laptop while I was using it to watch a movie. The Heat Wave had claimed two victims and pointed out one downside of laptops – their do not have heavy duty cooling systems.… However 3+ years of operation had proven the approach!
The next navigational computer, and the one we are using now, was based on an industrial computer. These are systems which are often sourced to do things like run Kiosks in the supermarket, or provide the “C” in CNC controlled machining equipment. Type typically are rather modest power (both in energy usage, as well as ‘graphics’ performance –Gamers need not look here!), and of key importance they often feature a Wider operation temperature range then consumer products, along with better design Power Supplies to account for electrically noisy environment. These last two directly go towards some of the challenges above, and is why I think it is better to use one of these systems as opposed to an old desk-top PC (or even a laptop – per my experience).
HARDWARE
In this world, a system built around the Mini-ITX computer board standard is a good approach. And using one of the lower power CPUs is all that is needed. We have a dual-core Intel Atom which has more than enough computing power for navigation as well as playing DVDs. As a plus, Atom CPUs use much less power than typical desktop CPU, and even most laptop ones! Often under 10w as opposed to as much as 50-80w that a desk-top machine might use. Or even the 20-30w common in laptops! I sourced our system from www.logicsupply.com They had good prices and a wide selection. There are even a growing number of systems targeted specifically for automotive use, which is great as they come with 12v power supplies designed to handle the poor 12v problem.
I went to their web site today; after looking around built up these three options. Each has the following in common:
- Uses Atom CPU – Low energy use, and more than enough computing power
- 2GB of RAM
- RS-232 ports – for directly connecting to NMEA-0183 devices
- Wide input-range DC Power Supplies (8-20v)
- A modest SSD (Flash drive) for the boot drive
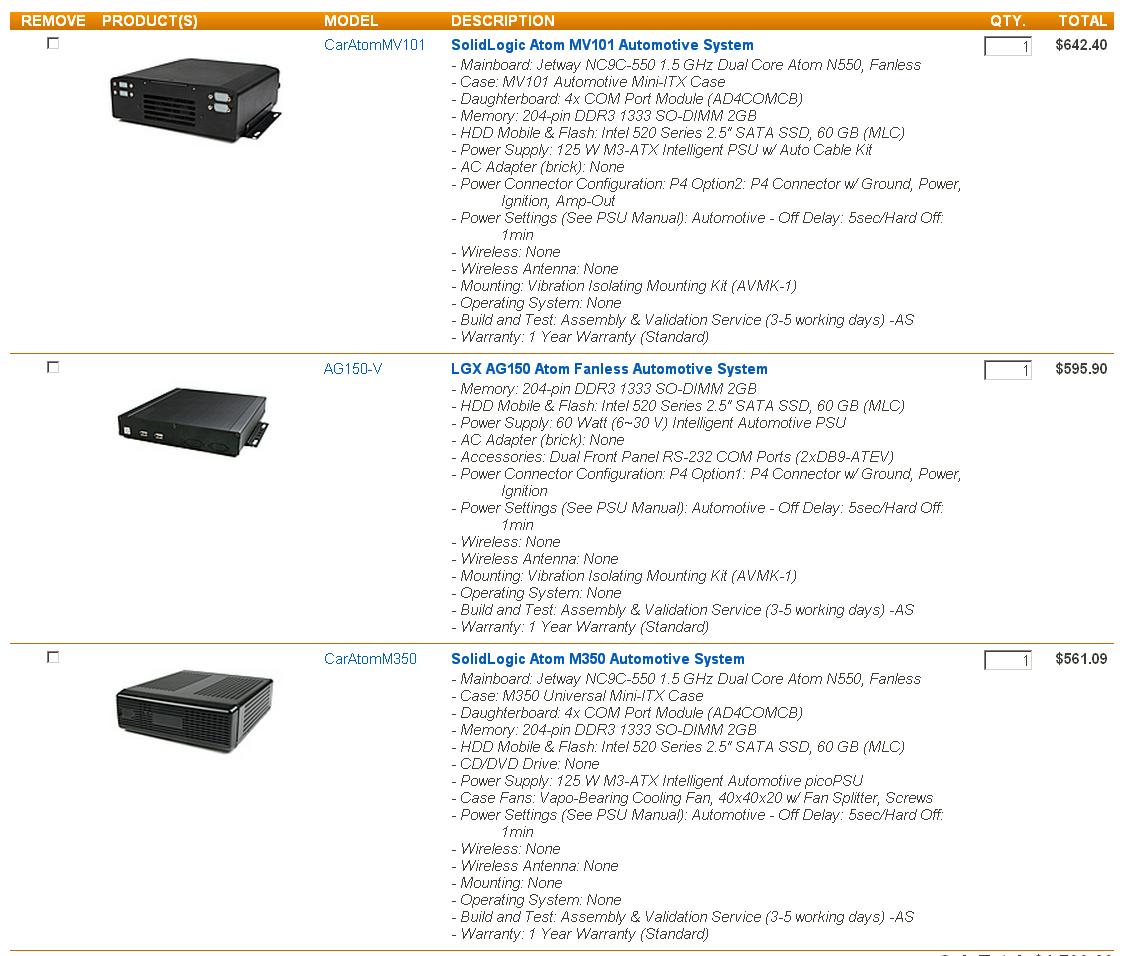
On Viking Star we have a Garmin GPS-152 and an AIS transceiver connected to the navigation computer, but I also intend to connect the Icom M802 SSB radio and Pactor modem to this system via RS-232 ports. Given that I would selected the MV101 because it has the cleanest approach to the most ports. If not for the M802 SSB (or if I had a newer USB Pactor modem) I would select the AG150-V and use one port for the GPS, the other for AIS and use just USB for the Icom/Pactor. And even with my older RS-232 Pactor - the cost savings of the AG150-V might go a long ways towards paying for the more expensive USB connected Pactor one! Perhaps the AG150 would win out in the end...
Our unit is mounted securely inside the overhead, connected to the external LCD display and DVD drive. To make a tidy installation I made a custom panel from http://frontpanelexpress.com. I also added a USB extension cable down to the counsel where I can attach USB speakers while playing movies, as USB keyboard when needed, as well as a Thumb Drive to bring in updates and transfer waypoints and routes. A wireless mouse completes the package. Just some ideas for these might be:
DVD: http://www.amazon.com/Samsung-SE-208AB-TSBS-External-DVD-Writer
Keyboard: http://www.amazon.com/Microsoft-Wired-Keyboard-600-Black
Wireless Mouse: http://www.amazon.com/Logitech-M305-Wireless-Mouse-Black
SOFTWARE
For the OS I selected WinXP. Linux would be another option, but I selected Windows primarily because (at the time) some of the support utilities (ala Weather FAX software) for the SSB were only available on Windows. I have tried Linux in the past and find it a good solution, though it does tend to require a bit more thinking to manage then WinXP (Don’t start with me on Vista…) – in the end I had WinXP disks, an available license (all nice and legal), and given our personal laptops all run Windows it is just as well to keep one environment.
When installing WinXP I made sure to also install SP3 (Download it from Microsoft http://www.microsoft.com/download/en/details.aspx?id=24). I also made sure to keep copies of all the software I installed – backed up on both an external HDD as well as a DVD. This will allow me to reinstall the software from anywhere in the world as needed.
With no Internet connection WinXP will need to use an alternative way for ‘validating’ the OS. Just follow the directions the Activation Wizard gives you – it usually involves a phone call and saying a long list of codes from your license sticker. Once WinXP is validated you need to backup this activated / ‘validated’ OS so that if you do find you need to re-image the system in the middle of the Pacific you will not have to also search out a payphone that works… Follow the direction here under “Backup Activation”: http://unattended.msfn.org/unattended.xp/view/web/29/#backup
The next configuration optimizations I made was to limiting unwanted writes to the SSD. Flash memory has a finite number of writes before they ‘wear-out’. During normal OS operation (Windows, or Linux..) there are two sources of writes we can reduce: Virtual memory and Temp files.
Virtual memory can be disabled following this registry tweek: http://pcmichiana.com/how-to-disable-the-windows-xp-paging-executive-ep-12/
The Temp files take a bit more effort, as we can’t just disable them as many programs need a ‘scratch pad’ area. What I did was create a RAM-DISK using part of the main system memory. Following these instructions, except make the RAMDISK only 64M in size (I made my drive R: ) – and when editing the Virtual memory locations, set all the sizes to 0MB to further ensure Virtual memory is disables. http://www.megaleecher.net/RAMDisk
 Next we need to inform Windows to use this new RAMDISK for temp files instead of our nice SSD. Click START and look for the “My Computer” icon. RIGHT CLICK on that and select PROPERTIES. Select the ADVANCED tab, and then click on the ENVIRNMENT VARIABLES at the bottom. You will get a pop-up window that looks like this. What you want to do is EDIT each of the entries (in both the top and bottom window) that are named TEMP or TMP. Edit them away from their current “C:\.....” location to the new RAMDISK spot you just created, ala “R:\TEMP” Then click OK and APPLY. That should be it!
There are many other things you can do to optimize, like disable FAX services, LAN services, all those things this DEDICATED computer will NEVER DO. Google for “WinXP Optimization” if you are interested. But for now this is a good start. And if you are using a newer version of Windows, the steps are basically the same, but the details are likely different. Again, Google can be your friend.
DISPLAY
Here can be a tuff one. Basically you want an LCD or LED display, but you also want one that can run directly off the 12v battery – as opposed to needing 120v. What you need to do is look for one that uses an external ‘Fatted Snake’ power supply and has a 12V-DC connector on the back of the dispaly. For me, I had to physically look at the units – as spec sheets often will not carry this level of detail. As such, mail-order was out…
Also make sure the display you select can be connected to the computer. The old standard use to be VGA, but now many systems support a newer connecter standard called: DVI just make sure you get one or the other on both the computer and the display.
But that is just a start. Remember battery power is anything but stable, or clean? When a display is labeled for 12V, it does not mean it can handle the 8-15+v range, nor all sorts of electrical noise… In the end many people just hook 12v displays directly to the battery and have no problems. But this WILL put added stress on the internals of the display, and depending on how well it is designed it is might have no issue. Or it might shorten the life, or it might eventually let out the Magic Smoke (You did know Electronics all run on Magic Smoke, right? That is why they stop working when it is let out!!!). On Viking Star I used an old HP laptop car adapter – part number: F1064A . These will take the wide range of battery voltage and provide a nice stable 12v to our display. Watch Ebay and do not pay more that $20
BRINGING IT TOGETHER
Aside from installing the OS and connecting the monitor and DVD drive (DVD is actually optional, we use it to – err – watch DVDs…), one needs to connect a GPS. There are very simple USB GPSes around for under $20 and they work surprisingly well. We have one kicking around as a backup that can be attached to either the navigation computer, or our laptops (which also have copies of SeaClear). But for normal operation I prefer a standalone GPS marine unit. A simple on that has a small screen and is able to show waypoints, but not so advanced as to be a ‘chart plotter’. Those screens are just too small I think for charts – plus one would need to purchase those proprietary charts – encroaching on the Frugal Factor..
We have a Garmin GPS 152 which is perfect. Connecting it via NMEA-0183 and one of the RS-232 serial ports. Here is a one web resource: http://www.gpsinformation.org/dale/interface.htm Google your actual equipment and RS-232 to see if you can find more specific directions. And one other technical note: NMEA-0183 is more correctly an RS-422 signal. There are some differences between the RS-232 and RS-422, but these will only show up if you use cables over 15’ or so in length. If you are within that the RS-232 ports would work fine. Above that, find someone who knows about long distance serial communications….
BTW: That trick of directing the TEMP files to the RAMDISK – Sometimes software install processes make heavy use of the TEMP directory, and because the ramdisk is rather small I have at times had problems installing software. The solution is to either temporally increase the size of the RAMDISK (using the Ramdisk utility), or switching the TEMP and TMP veriables back to C:\TEMP – install the software and then restore them to R:\TEMP.
FINAL THOUGHTS
Ok, this is now a stable computing platform to run applications on. It is critical to keep this thing DEDICATED to navigation. NEVER connect it to the internet – do not even hook up the LAN cable! NEVER run games on it, nor install anything but the core navigation programs. We Did installed a copy of VLC to play DVDs on ours http://download.cnet.com/VLC-Media-Player, and a copy of J-Tides. SSB / Pactor software will come, but that is it.
One final hint – built into WinXP is a keyboard emulator. It is under “START / ALL PROGRAMS / ACCESSORIES / ACCESSIBILITY / ON-SCREEN KEYBOARD “ I placed a link to this utility in the tool bar at the bottom of the screen and use to hunt-and-peck with the mouse for short typing needs. If I need anything longer, I dig out the USB Keyboard and use it.

OMG! Thank you! This makes so much sense, although I don't fully understand every detail (yet). I really appreciate the "hardware solution" build-ups, as there is much here that is still foggy to me. This discussion is so very well laid out and logical I have it printed and in my reference notebook. Thanks again.
ReplyDelete